

This manual applies to cPanel 11 control panel. If you use another panel version with your hosting provider, please contact your support team for any installation specific details. Anyway, the basic principles of installation are the same.
If the certificate is already issued on your domain name, you can install it using 2 methods.
Method #1
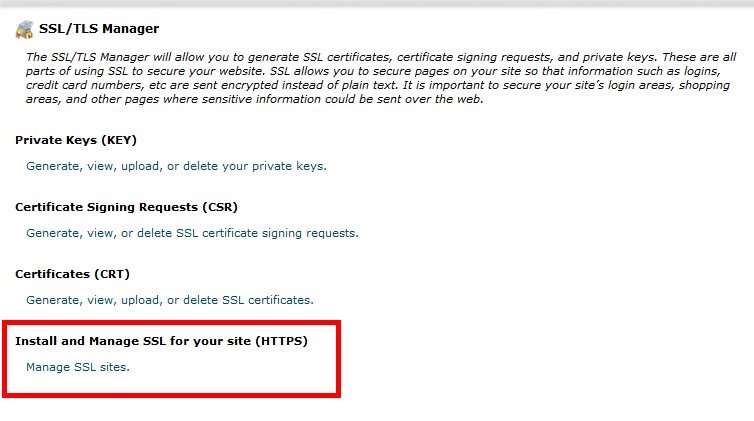
1. Choose SSL/TLS Manager under the Security section.

2. Press Install and Manage SSL for your site (HTTPS)
3. Choose your domain in the dropdown menu and then:
- paste Domain Certificate in the Certificate (CRT) section;
- paste RSA key which was generated with the CSR request in the Private Key (KEY) box;
- in the box Certificate Authority Bundle: (CABUNDLE), paste the CA-bundle file content. Some Certificate Authorities include the ca-bundle in several files. Their order in this box makes a difference. If the order is broken, cPanel will show the corresponding warning. You can check the right sequence at your SSL certificate provider or at the CA's website.
- "Enable SNI for Mail Services" option means that the encryption will be available not for the website access only, but for the mail as well. SNI configures mail services to use the domain's SSL certificate instead of the server's default certificate.
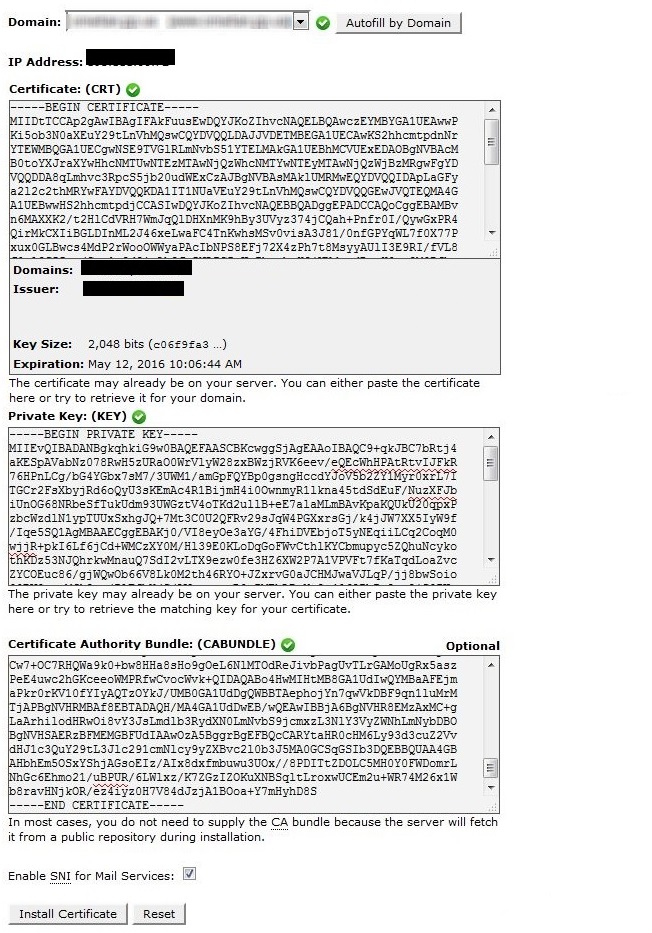
4. Save the changes clicking Install Certificate. The system will notify you on the certificate successful installation.
Method #2
1. Choose SSL/TLS Manager under the Security section.
2. Install Private Key:
- press Private Keys (KEY) - Generate, view, upload, or delete your private keys

- upload a New Private Key and paste the key in the corresponding box. You can also upload the key file using the 'Browse...' button below. Description box is optional.
3. Install Certificate:
- choose the option Certificates (CRT) > Generate, view, upload, or delete SSL certificates.

- upload the certificate.
The Primary certificate will be in the file named like my_domain_com. If the certificate has .crt extension, you can upload it using the button 'Browse...'. Otherwise, open the file with help of any text editor and paste the text from it in the box including BEGIN and END tags. Please do not include ca-bundle here.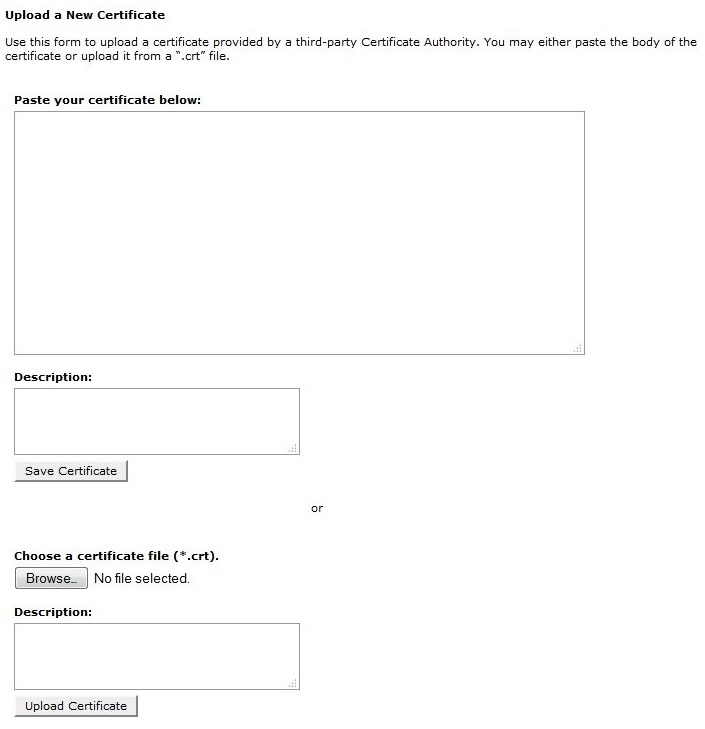
- save the certificate.
4. Add the certificate to the domain:
- go to Install and Manage SSL for your site (HTTPS)
- choose the domain form the drop-down menu
- click Auto fill by domain. The system will fetch earlier added certificate and key.
- cabundle can be added here if needed.
If the certificate needs to be issued yet
1. Generate CSR and RSA using SSL/TLS manager and its option Certificates (CRT) - Generate, view, upload, or delete SSL certificates.
- go to the option "Generate a New Certificate" and in the 'Key' section choose 2048 bit. If the key was earlier generated, you can choose that one from the drop down menu.
- choose the domain which should be secured by the certificate
- fill all the necessary fields
- we receive a CSR, which should be used further during the certificate generating.
Please check twice that you saved the RSA key as well. Do not pass it to anyone.
2. Install the certificate as described earlier in Method #2, point 3.
3. Add the certificate to the domain as explained in Method #2, point 4.
P.S. The certificate installation doesn't mean automatic opening of your web site via https. Several more steps should be taken:
Edit virtual hosts records of Apache configuration file - httpd.conf or apache.conf - in case you install the certificate on the VPS. On shared account you should edit .htaccess file
- RewriteEngine On
- RewriteCond %{HTTPS} !on
- RewriteRule (.*) https://%{HTTP_HOST}%{REQUEST_URI}
Also make redirect from http to https
Make sure that all the content loads via https.
You may need to reload web-server in case of virtual hosts editing. We would like to point out that this is the case with VPSs and some other hosting providers. On our shared hosting you can use .htaccess.
NB! You do not need a dedicated IP to install the certificate, since we use SNI extension on our servers, which allows multiple secure connections through the same IP. In this case web clients should implement SNI as well, for the certificate to be accepted correctly.