Blogging Tips: Transferring Your WordPress Blog Manually
 Each blogger is much concerned about his or her content integrity and any data loss becomes a real nightmare. The most embarrassing thing that can happen is when the blogger kills his own content by accident or by mistake when performing a manual transfer, for instance.
The Internet is actually full of various articles on how to transfer WordPress blogs, but when we came around the need to move our own blog to a different location, we had to do it in a slightly different way. This was mostly connected with the peculiarities of the initial setup of our blog, but we believe we are not the only ones who might encounter same problems. Additionally, not all the articles have all important details mentioned. Therefore, we decided to share some experience in manual WordPress blog transferring – SiteValley.com version, so to say.
Common Peculiarities of Manual Blog Transfer
Manual transfer of the blog usually implies separate moving of the content and the databases and also the paths changing (mostly concerns the URLs). Such transfers are actually not recommended for any software since they may corrupt the structure of the website. If there’s a possibility to transfer the entire hosting account – it’s always better to use this exact option. However, manual transfers may be needed when:
- a blog is hosted on an addon domain under some account and you need to have this domain and its content to be transferred to a standalone hosting account (with no domain change);
- a blog is a part of some website and you need to move it to a separate domain (e.g. you want to move mywebsite.com/blog to myblog.com);
- a blog was setup as a test instance and needs to be moved to the root folder of the hosted domain or vice versa (e.g. the content of mywebsite.com/testblog needs to be moved to mywebsite.com).
There may be several other reasons and variations, but the main idea is that you cannot transfer the entire account – you only need the content of that specific domain to be moved to another location. And you need it to work properly after the transfer, so keep reading.
File Backing-up, Transferring and Restoration
This is actually one of the easiest things, since everything you have to do is backup the entire WordPress folder and FTP it to the target folder. FTP is the keyword for transfers to remote hosts here, since this method is superior to file manager transferring method. Thus, you need to make sure that you have FTP access to both source and target accounts and that your FTP client is configured in an appropriate way. Backing-up process (actually, simple archive creation) can be performed via the file manager in your control panel, but if you have SSH access to your account it is advisable to backup your content using the following command:
tar –czvf wpbackup.tar.gz /home/%username%/public_html/%current_wp_folder%
Actually, having SSH access to the target server as well, you can use SCP file transfer method instead of FTP. Unlike FTP, SCP (secure copy) allows to exchange files between remote hosts directly. This saves a lot of time since you won’t have to download your files backup to your local machine first and only then upload it to the destination host. SCP command has a lot of options and therefore – syntax peculiarities. The simplest way to use it is to upload a file from the source server to the target server:
[%user%@%source_server%] scp -P %target_server_SHH_Port% wpbackup.tar.gz %user%@%target_server_IP%: (you may put a target folder path optionally, e.g.: %user%@%target_server_IP%:public_html)
This will deliver your backup file right to the home folder of your account on the destination server – the target folder value may differ upon your needs. After that you may simply extract your data using either control panel file manager or the “tar” command with different syntax:
tar –xzf wpbackup.tar.gz (use –C to specify the folder, without this parameter the archive will get extracted into the current folder)
Well, we seem to have coped with the data transfer. But that’s not all. We now need to take care of database transfer, too.
Database transfer
Database transfer differs from simple data transfer on all stages. First of all you don’t have direct access to database files due to user restrictions, that’s why you can back it up only by control panel means. Regardless of the control panel in use, you can create a backup of any single database you may need. To find which database contains your WordPress blog information – open the wp-config.php file. The very third line is going to tell you everything:
<?php
// ** MySQL settings ** //
define(‘DB_NAME’, ‘%current_database_name%’); // The name of the database
Since user restrictions disable you from leaving the backup on the server, you can only download it to your local machine. This may be somewhat inconvenient during inter-server transfers (e.g. in case you move your blog to a different account on the same server) but there’s not much to do about it. In the third case – inter-account transfer – you don’t need to make any of those steps at all.
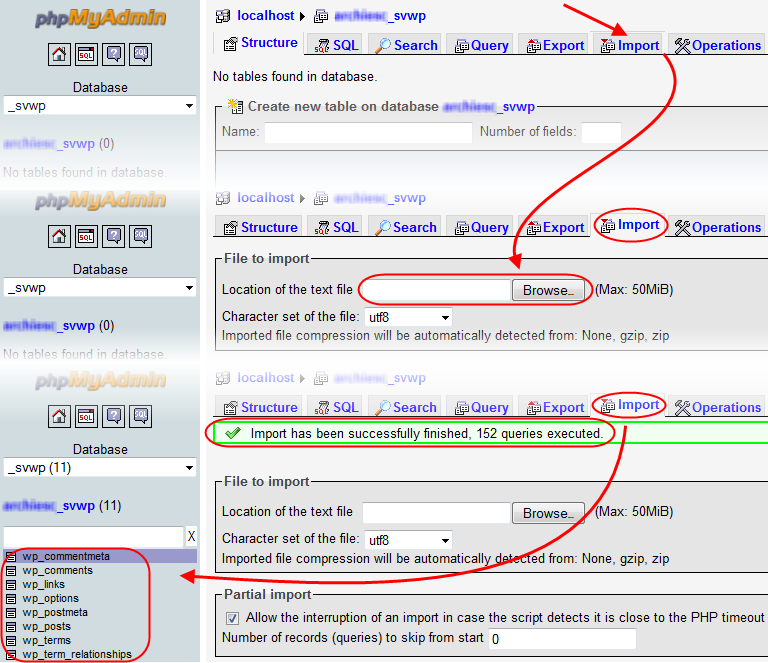
The second step is restoration. In your control panel you can find either general backup restoration or specifically MySQL dump restoration options. You should choose none of the above though. The thing is that account restrictions and corresponding control panel settings may not let this operation be executed correctly because of the database username change. Thus, it is better to use phpMyAdmin for those purposes.
First things first – we need to have a database created. Once you do it, you need to create a user and assign it to the new DB. Now we have a database and its user with the username, identical with the one of our control panel account. This is important since it excludes any risk of conflicts.

Transferring WordPress Database
The next thing we do is import our database by phpMyAdmin means to the existing ones. As far as you can see, all tables and their settings are safe and sound but now they are fetched from a different database. The last task to resolve here is to “teach” your WordPress how to “communicate” with that database. Using a built-in file manager editor we open the “wp-config.php” file and make such options as
<?php
// ** MySQL settings ** //
define(‘DB_NAME’, ‘%new_database_name%’); // The name of the database
define(‘DB_USER’, ‘%new_database_user%’); // Your MySQL username
define(‘DB_PASSWORD’, ‘%new_database_pass%’); // …and password
have the needed values now.
Post Transfer Fixes
After transferring WordPress blog to new host you need to make sure everything is going to work correctly. If you handled a transfer with no domain and blog directory change you can omit this step. However, it is always better to double check. Owing to the user friendly advanced WP admin interface many of those fixes can be done at your WP-admin panel, but if your website URL has been changed, you will need to make some changes in phpMyAdmin first.

Fixing Values in phpMyAdmin
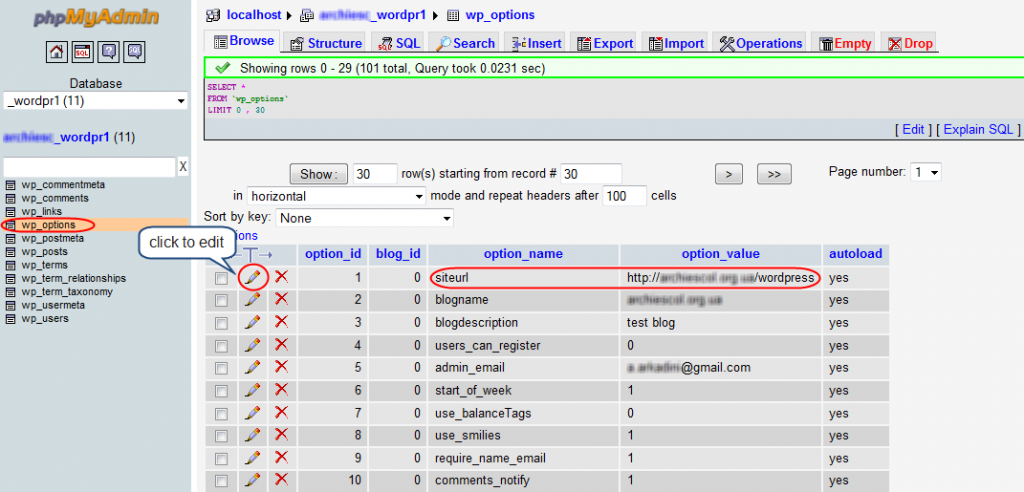
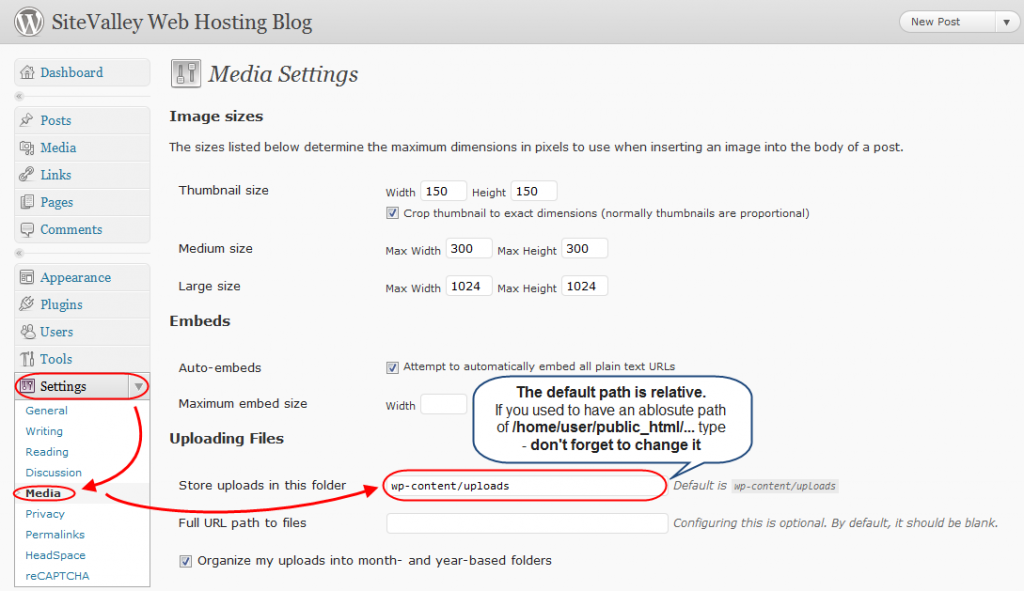
Changing the blog URL part is the easiest task that enables you to make all other fixes from the admin interface. Just choose the wp_options table (its prefix may differ, but the “_options” postfix will be there anyway) and find the first option “siteurl”. Once you change this one, don’t haste to leave – we need to have the “home” option changed to. Its option id is usually within the range of 30-40, so you might need to check the second page. Browser search works fine in phpMyAdmin, so feel free to use it. After that you can login to myblog.com/wp-login.php to finalize the transfer – to check or edit upload path for instance.

Fixing Values in WP-admin
Some More Tips
Looks like the main critical points have been covered, so wherever you might need to transfer your WordPress to new server or simply move it to a different location, you now have a guide for your particular situation. Here are some useful notes more:
- The more standard your WP installation is, the less problems you are likely to encounter after the transfer.
- If you are moving your blog to a different server, take care of the domain nameservers
- If your WP administrator’s or users’ emails are hosted on your website domain, don’t forget to backup your email, too.
The idea of this guide is to let everyone know how to transfer WordPress blog easily with no third party assistance. However, the main and the final tip here is: don’t hesitate to contact your technical support for any reasons. Data safety and integrity is way too important to risk.
Ready to transfer your WordPress but looking for a hosting service? Take a look at our shared hosting, cheap vps host and dedicated server offers.
Tags: Wordpress
