
Starting a blog is easier than you think, even if you have zero experience with site-building and no special skills. Each of the steps below is done in one or several clicks and each interface involved is more or less user-friendly.
1. Purchasing hosting and domain
Blog is a kind of a web-site and each website requires a name (domain) and space (web-hosting). When choosing hosting package, we recommend paying attention to the following: it should include cPanel and come with a free domain name (unless you already have one). For our sample blog we have chosen Newbie Hosting.
It has 1GB of disc space which is more than enough for your blog (of course, if you are not going to upload many media files which is strongly not recommended). Also it has сPanel and a free domain (if annual billing is chosen) as mentioned above:
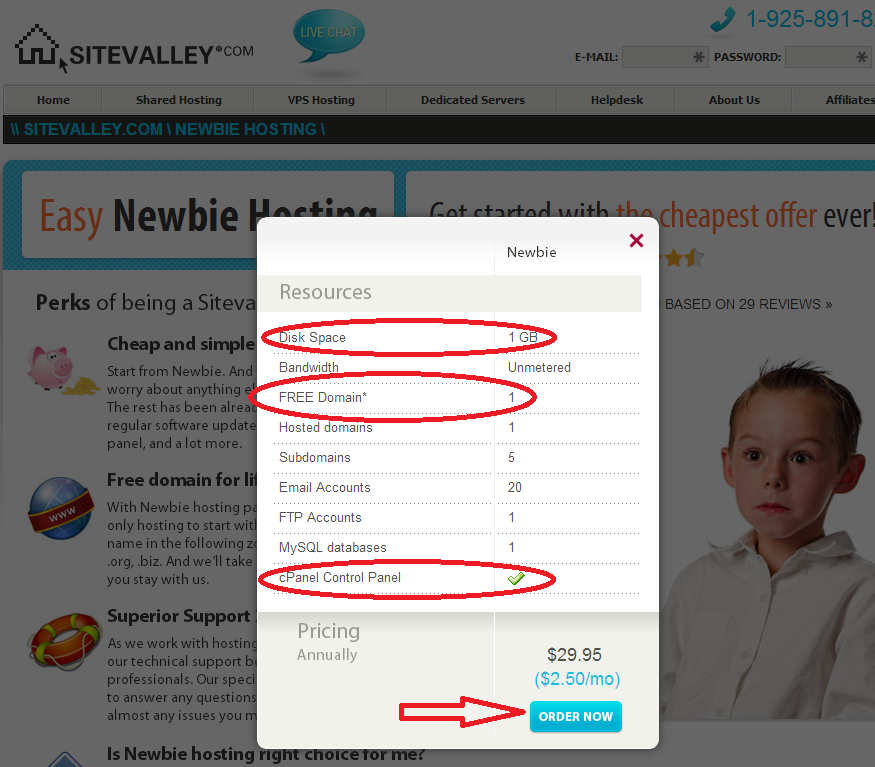
When choosing this package we were thinking about a blog with no heavy plugins and no crowds of visitors bombarding it – if that is the case, we don’t have to care if the package has enough resources to handle the load.
Important note: if you are using a third-party domain, you will also need to configure it for using our hosting by changing name serversat the end of your domain registrar (in most cases their support will be able to help with it).
2. Installing WordPress
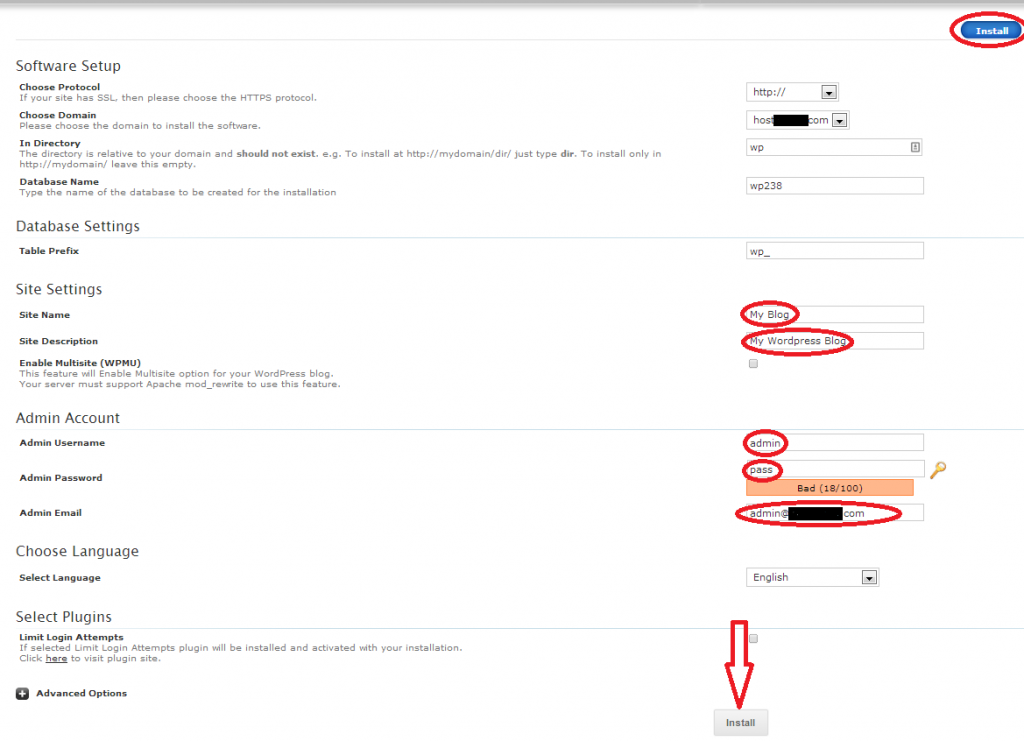
Shortly after ordering hosting+domain package you will receive welcome email containg login credentials for your hosting control panel and the URL to access it. What you need to do there is to find WordPress icon at the Softaculous Apps Installer section (at the bottom of the page) and proceed with the installation. The installation screen is simple, but please don’t just skip it – it’s important to fill in some of the fields correctly:
– site name and description: this is what will be displayed at the header of your blog, so be careful.
– admin username and password: leaving them as default is very insecure, so better change the username and invent a strong pass.
– admin email: should be your valid address.
We have circled these important fields here:
3. Selecting a theme
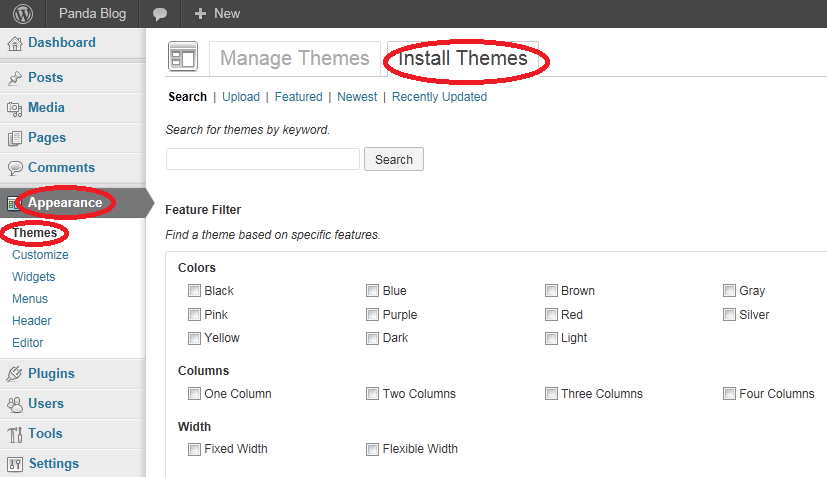
For now you are done with сPanel and can start working directly with WordPress. The admin panel is accessed at http://YOURDOMAIN.com/wp/wp-admin/ unless you have selected a different directory during the installation. Basically, you can start posting right away. However, we recommend to begin with choosing a theme, because theme is something that determines the genereral look of your site and something that is hard to change later. For that you should go to Appearance > Themes > Install Themes and then either search by criteria or browse featured options:
For our Panda Blog we have chosen a modern-looking and customizable theme called Sixteen. Once selected, it needs to be installed:
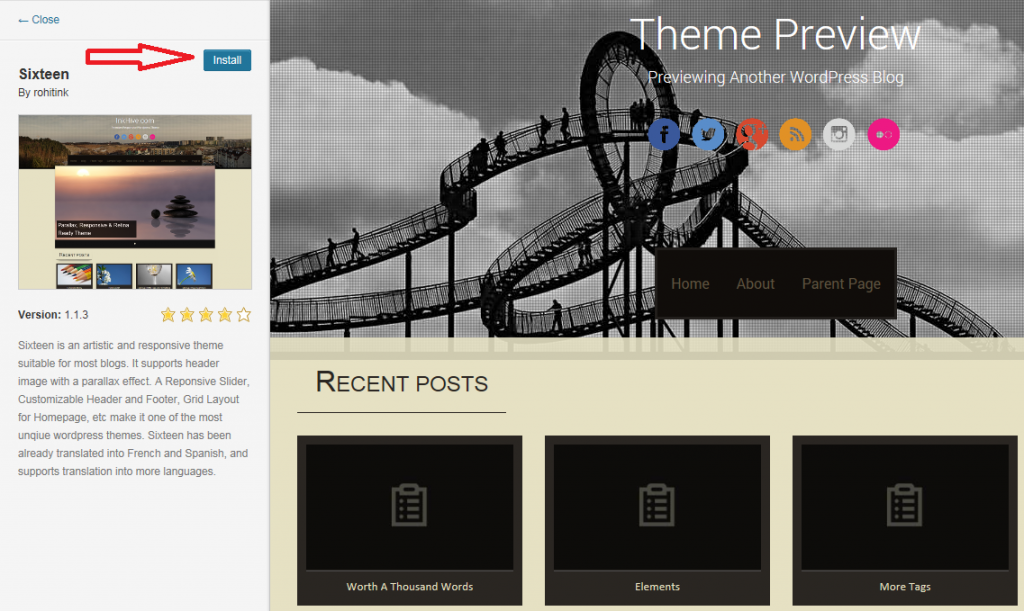
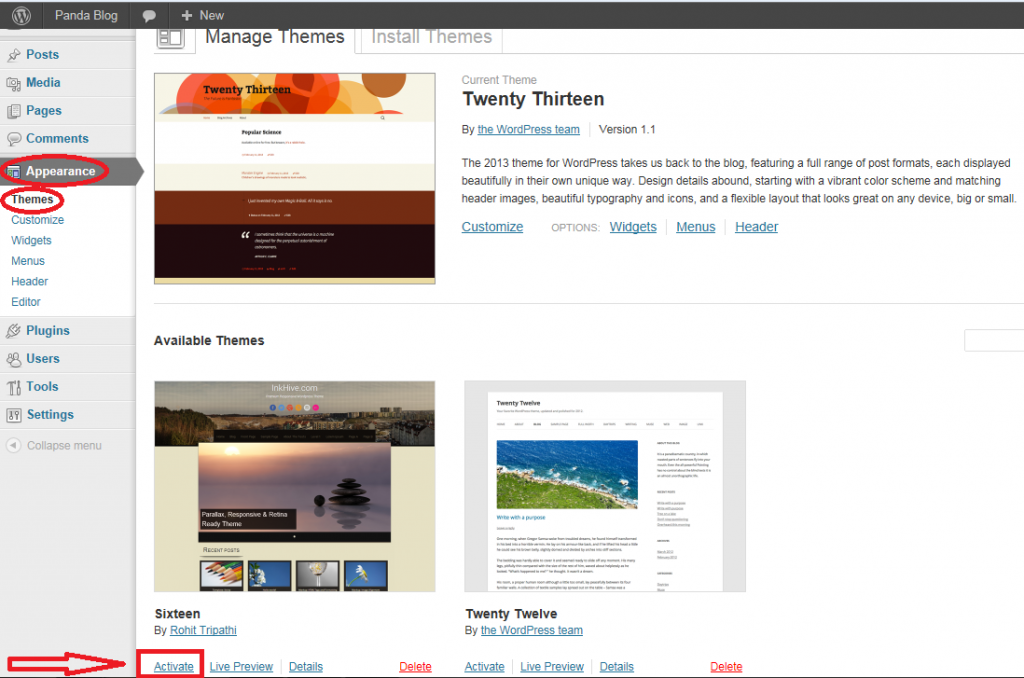
However, it does not start working automatically after the installation and you will also need to activate it at Manage Themes page, as shown below:
4. Changing header image
Now it’s time to take a first look at our blog. It can be found at http://YOURDOMAIN.com/wp/ (if you need it to show up at your main domain with no affixes, you can setup redirect anytime in cPanel):
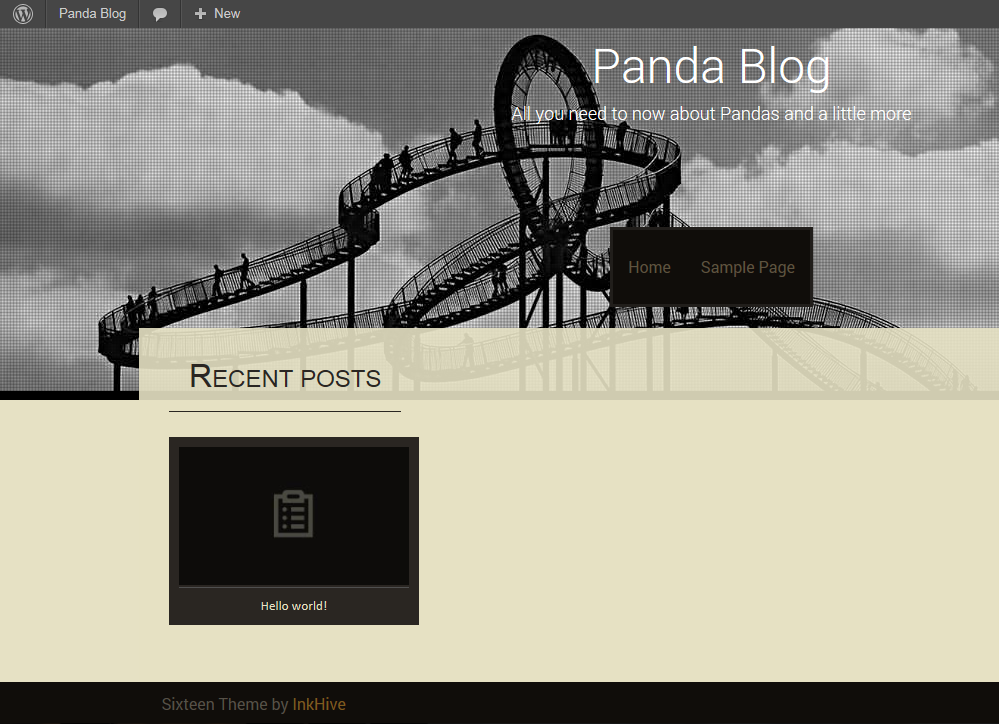
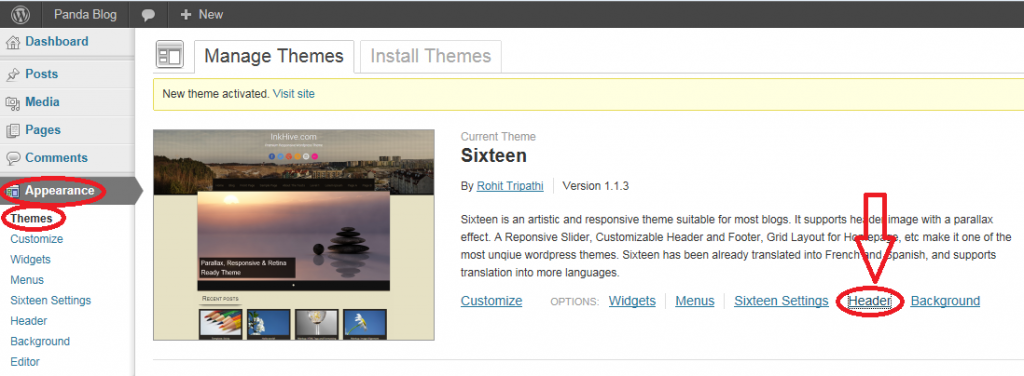
We didn’t like this default image, so we went ahead and changed it to a custom one. To do so, you will need to go to Appearance > Themes > Header (see below):
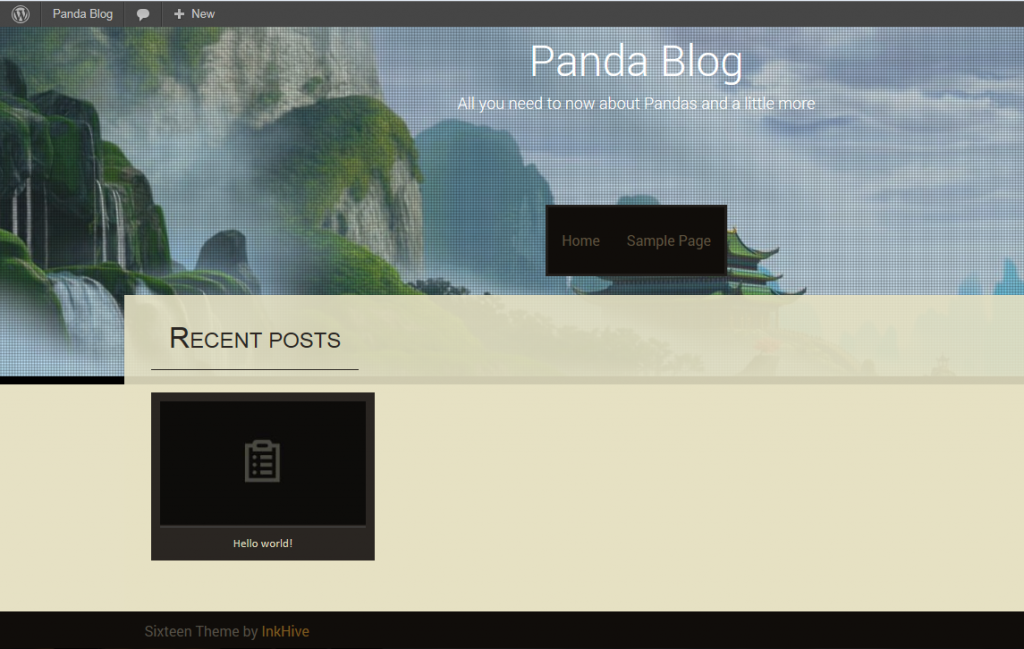
We recommend to use an image with neutral colours, to avoid mixing with the text. Here we go with our example:
5. Adding a post
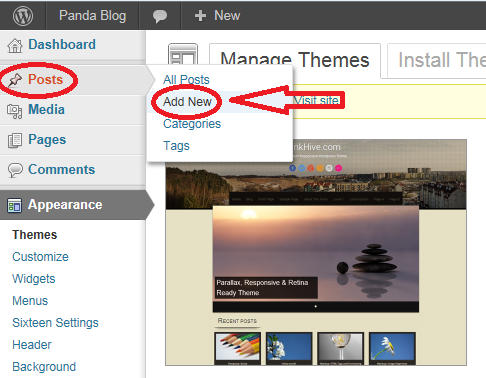
Now, when we are more or less satisfied with the header, let’s add a post (Posts > Add New):
The very process of post creation is very simple: just type or paste the text to the big box and a title to the small one. Add Media button wil help to insert a picture or embed a video. Set Featured Image option creates a thumbnail for this post which will be shown at the frontpage of the blog – so don’t skip it:
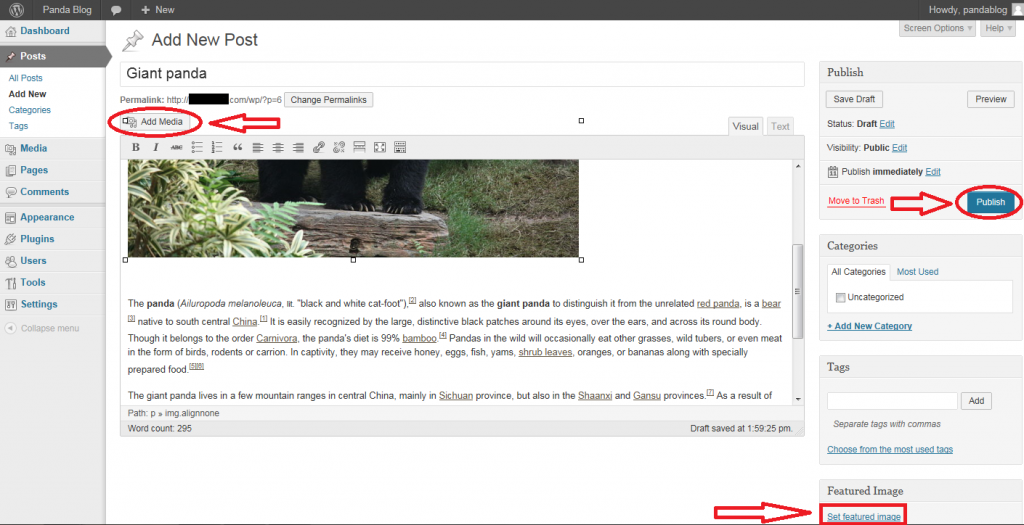
As soon as you are done with editing, press Publish button to send the post to the site. Then you can check the result of your work. That is how it looks in our case:

6. Removing sample pages
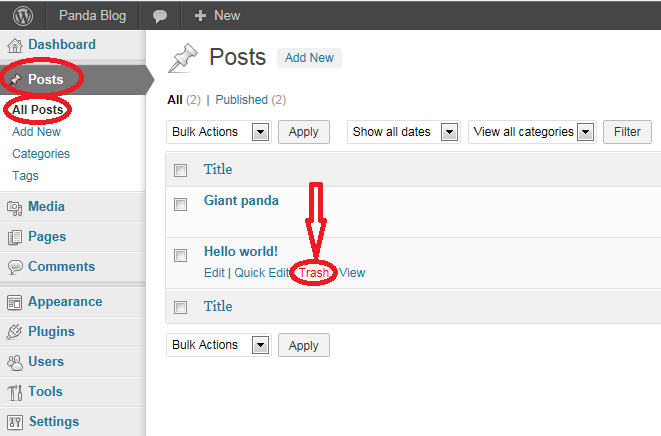
So, we have already added some content. And it’s time to get rid of sample ‘Hello World’ post and a sample page. First you need to go to Posts > All Posts and move the sample post to the trash from there:
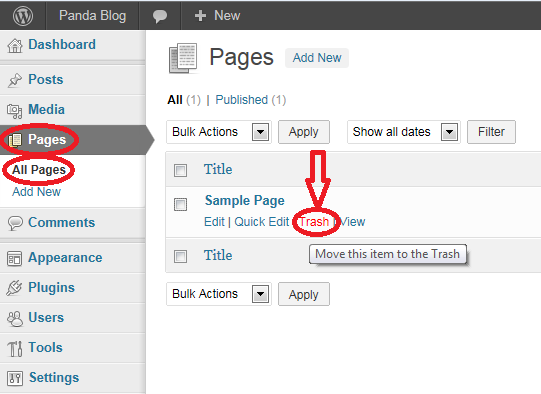
The sample page is to be removed in almost the same way (Pages > All Pages):
Now you can check your main page again and make sure that it is only showing preview of your content with no sample stuff. Here we go with our Panda Blog:

Our simple instruction stops here. It doesn’t mean that you should stop customizing your blog at this point though. Installing plugins, changing background and adding pages are just some of the steps you can take to make it better. And we wish you good luck.


Quick Customer care response, accurate and broad assistance, easy to use client area.....


I am very happy with the service. I am with site valley for many years and at the present usimg 2 hosting packages. Their service is excellent and super fast. Thanks & Greatly Appreciated


I've been hosting my websites with Sitevalley for more than 6 years. Very satisfied with the services and reliability they provide, competitive prices, almost no downtime, fast and knowledgeable customer support.


I have been using side valley for a couple of years now and have to say I am very happy with the service they offer.I use many Hosting services but site valley stands out in front. Reliable service, great support.I don't normally leave reviews but felt I wanted to for this service as it has been fantastic


I didn't want to review so soon on into taking out hosting with site valley but I feel obliged because their customer service is outstanding, second to none, every time I had an issue it was sorted immediately. I would highly recommend Site Valley.


I have been with Sitevalley for over a year and it's the best hosting I have EVER used. And I have been through a lot of them.


The support staff are amazing, and it's clear that they have a passion for hosting websites. I've rather enjoyed this webhosting company and it's stability for the price is bar-none, amazing.


My collegue adviced me to use SiteValley as a reliable hosting provider with great prices, professional and fast Customer Service. My experience with SiteValley was exactly the way I was promised.


I have been with SiteValley for many years, and plan to stay with them for many more. Customer support is very responsive and knowledgeable.
SiteValley.com is rated 4.8 / 5 based on 329 Reviews »

© 2001 – 2026 SiteValley.com. All Rights Reserved.