Every hosting account holder must understand the importance of backups. They play the same role in information technology, a car insurance plays in everyday life. Backups help you in case of unexpected issues with content on your account. Forums, blogs and similar projects take a lot of time to develop, but one serious spontaneous error in the system can damage all your information or even make it vanish entirely. This can happen due to numerous reasons: hardware and software faults, to name a few. Take into consideration such widely spread activity as hacking, and you will realize the scale of existing menaces. As a matter of fact, any WordPress blog, which is not updated on time, can easily fall victim to such malicious activity . This is also true for any kind of web software. Last but not least, you can accidentally make errors in data of your blog yourself, and then you need a point to roll back to. Backups enable you to do just that.
One of the easiest ways to make sure you can recover after most content related disasters is to make backups of your account from time to time. In case you run a WordPress based blog, having a backup of entire account is not necessary. It is enough to simply have a couple of healthy database dumps, which contain all important information, including your posts. Since posts are the most important part of any blog, having them in reserve archives saves you a lot of work in case of emergency restoration.
There are numerous backup plugins for WordPress, but the mechanisms used in them are not as secure and reliable as the method described below. I will try to explain a way to use cron jobs on your hosting account to perform back up of your WordPress database.
The cron is a special scheduling service independently run on the server. Let’s say we have a set of commands to be executed. In this case, using cron jobs commands can be scheduled for regular execution, requiring no attention from the user whatsoever. The process will be fully automated. Since cron is an independent service, it is more reliable and more efficient than the wordpress plugin scripts. There is a special section for configuring crons with the help of GUI in most hosting control panels.
The set of commands we want to be executed in the framework of backup procedure is relatively small. First of all, backup dump creation will be scheduled and compressed immediately after being made in order to conserve disk space. We will also apply the command to change the access permissions for this archive in order to decrease the possibility of it being stolen or damaged. We can configure backup to be written to the same file on the daily basis (the simplest solution), but this is not very convenient, as corruption of information can happen without you noticing it and then this corruption will be written over a healthy backup. We will make backups on the daily basis, but will write the information into different files. The date will be added to the name of the file, so that it is easier to identify files you need. Additionally, we will configure the cron to delete the backup files, which are over 7 days old, in order not to fill up the space on the account with backups.
The list of described commands needs to be stored in one file. This allows us to use just one task in cron daemon to execute several described commands. Files of this kind are called scripts. I will show what the content of the file can be on example of commands used on Sitevalley Blog hosting account. (Please note that some paths can differ for various operating systems, such as FreeBSD and Linux. The list of commands given here is for usage in FreeBSD OS installed on Sitevalley hosting servers. If you are not sure about correct paths/locations, it is better to consult your hosting administrators).
You can use any text editor to create the script file. It needs to have extension ‘.sh’. I named the file ‘wp-bps.sh’. The content of the script file should be the following (Please note: I take no responsibility for any data loss or corruption when using this script):
#!/bin/sh #This line shows the cron what utility should be used to execute the commands in this file.
# Username to access the MySQL server. In the line below substitute the ‘database_user_name’
#with the appropriate username for the database of your wordpress.
USERNAME=database_user_name
# Username to access the MySQL server. In the line below substitute the ‘database_password’
#with the appropriate password for the database of your wordpress.
PASSWORD=database_password
# Host name (or IP address) of MySQL server. Here simply leave the ‘localhost’.
DBHOST=localhost
# Name of the database to make the backup of. In the line below substitute the ‘database_name’
#with the appropriate name of your wordpress database.
DBNAME=database_name
# Backup directory location. In the line below substitute the ‘backup_directory’
#with the path to the directory where you want your backups stored.
#E.g. /usr/home/username/domains/myblog.com/public_html/wp-backups/
BACKUPDIR=”backup_directory”
#Specify the age of the backups that should be deleted.
#This is needed in order to avoid abusing the space on account with backups.
#(m=month; h=hours, m=minutes, s=seconds).
#Substitute the ‘backup_age’ with an appropriate value (e.g. 7d).
BPAGE=backup_age
#Location of mysqldump command. Here you need to substitute the ‘path_to_mysqldump’
#with the path to the location where the mysqldump command is situated.
#E.g. /usr/local/mysql-5.0.51a-freebsd7.0-i386/bin/
MYSQLDUMPLOC=”path_to_mysqldump”
#No changes needed below this line
PATH=$PATH:$MYSQLDUMPLOC;
DATE=`date +%Y-%m-%d_%Hh%Mm`
mysqldump -u$USERNAME -p$PASSWORD $DBNAME | gzip > $BACKUPDIR/mysql_backup_$DATE.gz;
chmod 600 $BACKUPDIR/mysql_backup_$DATE.gz;
find $BACKUPDIR -type f -name “*.gz” -mtime +$BPAGE -exec rm -f {} \;
You need to make changes described on lines in blue color (you can download a file with this script here). If you are not sure about database_user_name, database_password and database_name you can check this information in the file ‘wp-config.php’ located in the folder where you installed your wordpress. You need to look for the following lines within this file (information in blue in the example):
// ** MySQL settings – You can get this info from your web host ** //
/** The name of the database for WordPress */
define(‘DB_NAME’, ‘your database name here‘);
/** MySQL database username */
define(‘DB_USER’, ‘ your database user here ‘);
/** MySQL database password */
define(‘DB_PASSWORD’, ‘ your database password here ‘);
/** MySQL hostname */
define(‘DB_HOST’, ‘ your MySQL hostname here ‘);
When you are done editing your .sh file, you need to upload it to your hosting account. As soon as it is done, change its permissions to 600. This permission set will prevent other users on the server and your site visitors from accessing and editing this file, which is a reasonable security measure.
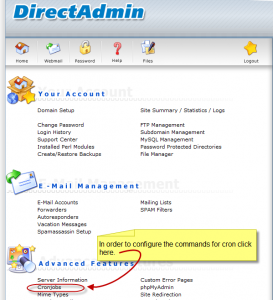
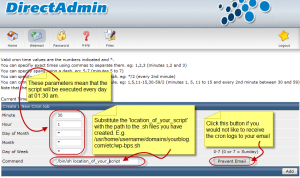
Now your script file is completely ready to be used with a cron. Go to your Direct Admin control panel (or any other admin panel). Follow the steps shown in figure 1 and 2 to configure the cron job (figures are applicable to DirectAdmin panel only).

Figure 1. Cronjobs menu

This is it, the cron job has been scheduled to regularly execute the backup script. You can download the backup files to your local PC or Mac using a regular FTP or SCP client. Even though the cron will work autonomously, it is still recommended to occasionally download copies to your local computer. I recommend doing this because we have configured the script to delete the backups which are over 7 days old.
Using cronjobs for backing up your wordpress databases is relatively easy, yet very reliable. Such backup script posses several advantages as compared to plugins, such as:
Of course setting up such cronjob requires a little typing and research. But in general, it is easy enough for any beginner to implement. And unlike plugins the code is very clear and easy to understand and debug in case of issues. Do not forget you can create a backup on the remote host for more security and safety. You can use on of cheap VPS hosting plans to store backups.
We at Sitevalley hope this code will help making your hosting experience safer and more efficient.


Quick Customer care response, accurate and broad assistance, easy to use client area.....


I am very happy with the service. I am with site valley for many years and at the present usimg 2 hosting packages. Their service is excellent and super fast. Thanks & Greatly Appreciated


I've been hosting my websites with Sitevalley for more than 6 years. Very satisfied with the services and reliability they provide, competitive prices, almost no downtime, fast and knowledgeable customer support.


I have been using side valley for a couple of years now and have to say I am very happy with the service they offer.I use many Hosting services but site valley stands out in front. Reliable service, great support.I don't normally leave reviews but felt I wanted to for this service as it has been fantastic


I didn't want to review so soon on into taking out hosting with site valley but I feel obliged because their customer service is outstanding, second to none, every time I had an issue it was sorted immediately. I would highly recommend Site Valley.


I have been with Sitevalley for over a year and it's the best hosting I have EVER used. And I have been through a lot of them.


The support staff are amazing, and it's clear that they have a passion for hosting websites. I've rather enjoyed this webhosting company and it's stability for the price is bar-none, amazing.


My collegue adviced me to use SiteValley as a reliable hosting provider with great prices, professional and fast Customer Service. My experience with SiteValley was exactly the way I was promised.


I have been with SiteValley for many years, and plan to stay with them for many more. Customer support is very responsive and knowledgeable.
SiteValley.com is rated 4.8 / 5 based on 329 Reviews »

© 2001 – 2026 SiteValley.com. All Rights Reserved.