
Welcome back to Sitevalley blog. This time we will talk about setting up the simplest possible site using one of the most popular Content Management Systems. The script we are going to use is ‘Joomla’. It can be easily installed using the ‘Installtron’ in your DirectAdmin control panel. The ‘Joomla’ installation is available on ‘Pro hosting Plan’. All the content data used in this post was taken from Wikipedia.org.
We will pursuit the following goals for the site we will be creating (let’s think of this as of a technical task):
This tutorial will consist of two posts. The first one (i.e. this one) will show you how to create the content for a site meeting the tasks above very easy and fast. The second post will show how to configure the menus and various modules in order for all of you content to be comfortable accessible from you front page. It will also give description of the basic theme’s layout and several instructions where to place what on your site.
Content is the most important part of any website. So far we are starting with a blank website. Therefore the first thing we will do is add the articles. Sorting of articles is done in two ways:
Generally sections contain numerous categories and the categories contain numerous articles. Now we will create the sections required by our goals.
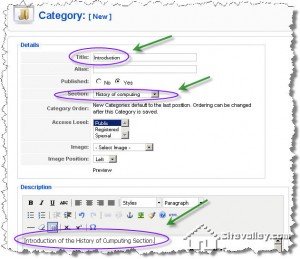
The process is as follows:
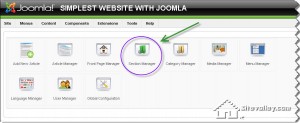

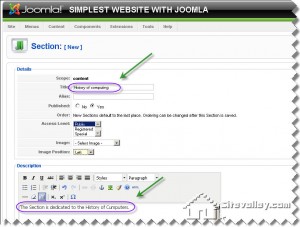
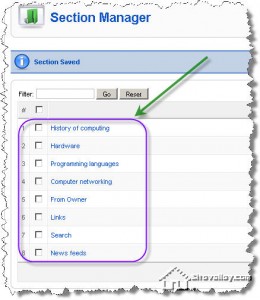
When done simply click ‘Save’. Add all the sections we will need in a similar way. As a result you should have the following sections: history of computing, hardware, programming languages, computer networking, from owner, links, search and news feeds. You should have something similar to the following picture:
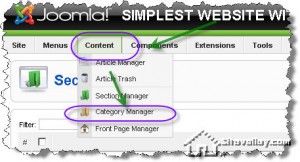
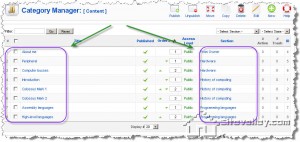
Now it is time to go ahead and add several categories. Categories are aimed at managing more specific grouping. We will add 3 categories (Introduction, Colossus Mark 1 and Colossus Mark 2) to the ‘History of computing’ section. We will add the ‘About me’ category to the ‘From Owner’ section. The ‘Hardware’ section will be given ‘Peripheral’ and ‘Computer busses’ categories. The ‘Assembly languages’ and ‘High-level languages’ will be the categories of the ‘Programming Languages’ section. So the idea of the categories should be a little clearer now. Let’s take a look at what we have to press to get stuff done:

So far your ‘Category Manager’ should look like this:
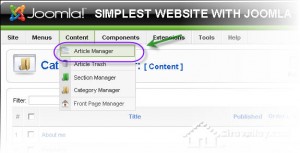
The main purpose of sections and categories is to sort the articles in the most convenient way. Therefore we have to create the articles that contain the content itself. Joomla makes creating articles as simple as typing documents in any text editor. Go to ‘Content->Article Manager’ in your Joomla:
This will bring you to the screen of the article manager which lets you see all articles you have on your website and also displays the information about them. As we don’t have any articles yet we need to proceed with creation of our first one. Click on ‘New’ to begin:

At this point we are looking at the article screen. Two things you will most often do from here besides creating the articles itself are:
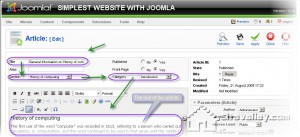
The text editor of the articles lets you do whole bunch of things like changing fonts, styles, alignment, adding lists, links, pictures, special symbols etc. There are also three extremely convenient buttons on the bottom of the editor, they are:
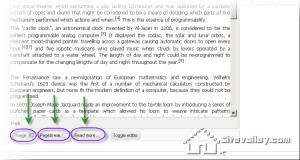
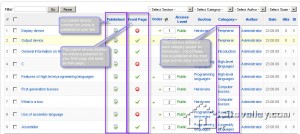
Now let’s create 1 article in the ‘Introduction’ category of the ‘History of computing’ section. We also need to create 2 articles in each of the following categories: ‘Peripheral’, ‘Computer busses’, ‘Assembly languages’, ‘High-level languages’. You can go ahead and create as many as you wish, for our tutorial purpose the mentioned above will be enough, don’t forget to try ‘page break’ and ‘read more’ features. In every category, you have created the articles for, only one article should be published on the front page. When you’re done you should have something similar to:
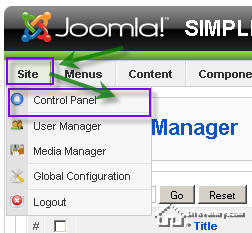
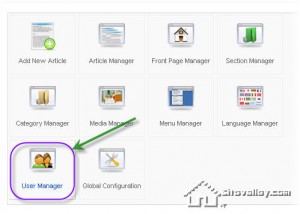
Some of you may want to let some other people be able to add, edit or delete content from your site. Here is where users come in Joomla. Let’s create a couple of users. Go to ‘Site’ menu and choose ‘Control Panel’. Click on ‘User Manager’:
 |
 |
Once in the User manager click ‘New’ to add a user:

Let’s first create a user with administrative privileges by adding him to a group Administrator. Fill in the appropriate fields as shown in the picture below:
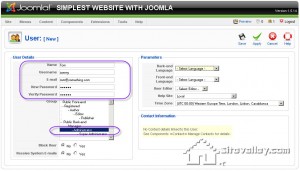
When done simply press ‘Save’. The administrators can introduce changes not only to content but to a whole site. We would also want to create a person who will be capable of adding articles to the categories and this will be a ‘Manager’ group representative. So when creating such user instead of ‘Administrator’ you need to select ‘Manager’ in the ‘Group’ filed.
So as a result of performed operations we have 3 users in total: Administrator, Tom (also an administrator) and Bill (a manager):
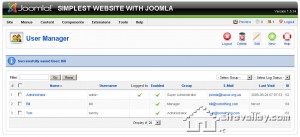
Now we will be creating the contact page content. So far we have three users so we need to add some contact information about them. Go to the ‘Components’ menu, select ‘Contacts’ and then ‘Categories’:
Once in the ‘Category Manager’ of ‘Contact Details’ press ‘New’ in the top right part of the screen (this button is located in the same place as in all previous cases). Let’s create a category called ‘Staff’:
After you type the title of the category ‘Staff’ and press ‘Save’ you need to select the ‘Contacts’ tab:
Here we will add the contacts themselves and then place them into the ‘Staff’ category. As usual press ‘New’ in the top right part of the screen. Let’s start with the webmaster of the site (who is actually you). In case of this example the webmaster is the same as the ‘Administrator’ user, so we need to remember this when creating this contact. The other thing we need to keep in mind is the fact that we have already created the category for our contacts, so make sure you add every contact to the category ‘Staff’ as in the picture below:
Input all important contact information available and decide which info should be available to the public: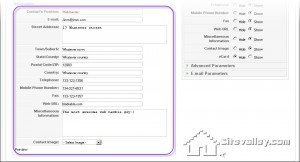
When you’re done simply press ‘Save’ as usual. You can add as many contacts as you need, but for our tutorial 3 contacts corresponding to the users we have is enough. When finished you should get something similar to this: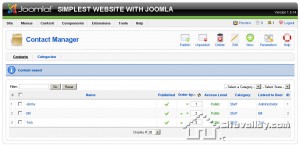
As the World Wide Web is the greatest net of all known to mankind the main brick of it are the weblinks that actually bond resources together. So you would definitely want to have a ‘Weblinks’ section to link to other websites with related resources.
Go to the ‘Components’ menu, there select ‘Web Links’ and then ‘Categories’.
In the just opened window press ‘New’ in the top right region of the screen.
Create a category for ‘Computer Information’, then press ‘Save’. Now go to the Links tab:
Here once again click the ’New’ button. Let’s add one link just to see what it looks like. Type ‘The Computer Information Center’ in the ‘Name’ field (this is the name of the web link). In the ‘Category’ field choose the ‘Computer Information’ we have just created. In the ‘URL’ input the link ‘http://www.compinfo-center.com/’ (this is a real link actually). You can add some information to the ‘Description’ section to make it easier for your visitors to find the links they actually need. Now press ‘Save’.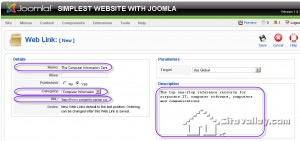
The last piece of information we need to add to our content is News Feeds. New feeds are pretty useful as they keep trace of all the latest news and automatically display their titles on your website. To use the news feeds we would need to let the Joomla know where to take the news from. There are plenty of news feeds available on the net.
You will easily find the feeds for your own topic in the Internet. Now go to ‘Components’ menu, select ‘News Feeds’ and then ‘Categories’:
Here press ‘New’ (by now you already know where to find that button for sureJ). Create the category named ‘Computer Information’. Press ‘Save’.
Now go to the ‘Feeds’ tab and click ‘New’: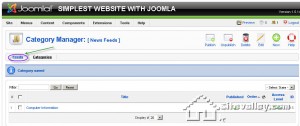
Fill in the ‘Name’, ‘Category’ and ‘Link’ fields as shown in the picture below (you can use any RSS feed, in this example we used http://feeds.feedburner.com/OurLatestDiscovery: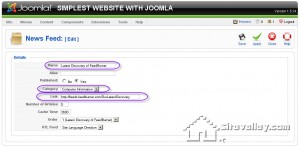
When done press ‘Save’. So far your front page should look like this: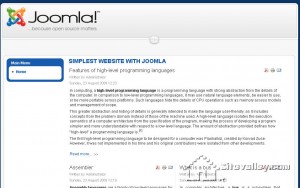
So far in this part of the Tutorial we have covered the creation of content for your website. We have created several Categories and Sections and then added articles to them. We have also introduced two additional users (Tom and Bill). We have added the contact information to every person who will take part in management of the site.
To interconnect with other resources on the Internet we have added content for the Web Links section and also added two resources to get the news feeds from. So far all of the above is the content of your website.
But the content itself is not too useful if not represented in an appropriate way. Right now most of the content you have created is not available from your front page.
The second part of this tutorial will cover actions required to present the content on your site using Menus . We will also see how to place the various menus exactly where you want them to be placed (simply put – the layout of your website). The last but not least we will do is change the Joomla logo to your own.


Quick Customer care response, accurate and broad assistance, easy to use client area.....


I am very happy with the service. I am with site valley for many years and at the present usimg 2 hosting packages. Their service is excellent and super fast. Thanks & Greatly Appreciated


I've been hosting my websites with Sitevalley for more than 6 years. Very satisfied with the services and reliability they provide, competitive prices, almost no downtime, fast and knowledgeable customer support.


I have been using side valley for a couple of years now and have to say I am very happy with the service they offer.I use many Hosting services but site valley stands out in front. Reliable service, great support.I don't normally leave reviews but felt I wanted to for this service as it has been fantastic


I didn't want to review so soon on into taking out hosting with site valley but I feel obliged because their customer service is outstanding, second to none, every time I had an issue it was sorted immediately. I would highly recommend Site Valley.


I have been with Sitevalley for over a year and it's the best hosting I have EVER used. And I have been through a lot of them.


The support staff are amazing, and it's clear that they have a passion for hosting websites. I've rather enjoyed this webhosting company and it's stability for the price is bar-none, amazing.


My collegue adviced me to use SiteValley as a reliable hosting provider with great prices, professional and fast Customer Service. My experience with SiteValley was exactly the way I was promised.


I have been with SiteValley for many years, and plan to stay with them for many more. Customer support is very responsive and knowledgeable.
SiteValley.com is rated 4.8 / 5 based on 329 Reviews »

© 2001 – 2026 SiteValley.com. All Rights Reserved.