 Knowing and understanding the way people find, browse and leave your website is important for marketing purposes. This kind of data is generally called web tracking statistics. In order to obtain this information you will need a website analysis software. Today, numerous products exist for the purpose of tracking web visitors, as well as collecting reports about how they navigate around your web resources. The simplified concept of such programs is to get information about a user visiting a site (e.g. type of browser he is using, operating system, language etc.) from a requests made in a browser, combine it with data about the pages he is visiting at the moment, the source he came from and the page he left the site at, store this info and provide means for its convenient analysis. Understanding website statistics allows performing well-grounded changes to the site, plan and estimate efficiency of marketing campaigns and generally understand the behavior of visitors.
Probably, the best available service for collecting advanced web metrics is Google Analytics. It has a huge list of features and capabilities. The best part about it is that it is totally free to use. Moreover, it is hosted on the Google servers, so it causes no load to your host. Google Analytics setup is relatively simple, which makes it not only the best software with vast capabilities, but also a very popular and widely used one. In this guide you’ll find a step-by-step instruction on how to set it up and start getting quality information about your visitors as soon as possible.
As most Google products, web metrics with Google Analytics starts at Gmail.com. Even if you already have a Gmail account, it is still a good idea to create a separate one for setting up Google Analytics. Using a separate account will let you keep your personal and business things separate to avoid mixing them up. Once you have the Gmail account, sign into it and head to http://google.com/analytics. You will see the page like the one below:
Here you should simply click the “Sign Up” button. As soon as this is done, you will be taken to the page where you’ll need to fill in the information about your website and region. It is convenient to name analytics accounts with your domain name, this way it will be easier to navigate around if you plan to have multiple accounts. After you are done, click the “Continue” button.
The next page will require your personal and regional information. After you are done filling this in once again click “Continue”:
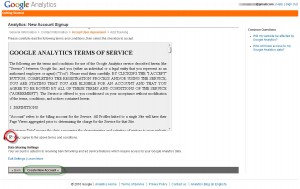
The page following the one with the personal information is the license agreement. Here you should tick the box “Yes, I agree to the above terms and conditions” after you read the agreement and click “Create New Account”:

Once the account is created, you will be taken to the Tracking Instructions page. I recommend going straight to the advanced tab. Here you can choose what kind of website you want to track: whether your site is located on a single domain, on domain with multiple subdomains, on multiple top-level domains, or if this is a site aimed at mobile users. You can leave the Adwords settings intact for now, because they can be edited at anytime later and are not crucial for functioning of Analytics. If your website is dynamically driven, then you should tick the “I want to track dynamic content” (accordingly, if it is written in PHP then you should tick the appropriate box). Once you tick these boxes, you will see additional instructions above the box with tracking code. In order for your site to be tracked you need to copy this code and paste it onto the pages you want to track immediately before the body tag. Use the following page skeleton to locate where to paste the code:
<HTML>
<HEAD>
<TITLE> Page Title Here </TITLE>
</HEAD>
<BODY>
Content of Your Site Here
***Google Analytics code goes HERE***
</BODY>
</HTML>.
In case you have a dynamic site, follow the instructions given above the mentioned box with the code (see the screenshot below). Once you select everything that is appropriate for your site and copy the code, click “Save and finish”.
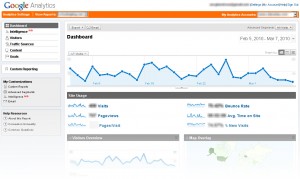
Congratulations! Google Analytics account set up is finished. Now you need to paste the tracking code onto every web page you want tracked (or paste it onto the template in case the site is dynamically driven). Your newly created account will look something like the screenshot below. It will take approximately 24 hours after you paste the code for the first data about your visitors to appear here.
In about a month you will have first sufficient information to draw conclusions about your visitors and site. Your account report will look then somewhat similar to the following screenshot:

As you can see, setting up Google Analytics is quite easy – no complex coding or manipulations. Remember that the sooner you set it up the sooner you will be able to use it. Here are some useful pages on further configuration and usage of your Google Analytics account and tracking:
Looking for reliable hosting for your website? Take a look at our cheap vps server hosting offers.


Quick Customer care response, accurate and broad assistance, easy to use client area.....


I am very happy with the service. I am with site valley for many years and at the present usimg 2 hosting packages. Their service is excellent and super fast. Thanks & Greatly Appreciated


I've been hosting my websites with Sitevalley for more than 6 years. Very satisfied with the services and reliability they provide, competitive prices, almost no downtime, fast and knowledgeable customer support.


I have been using side valley for a couple of years now and have to say I am very happy with the service they offer.I use many Hosting services but site valley stands out in front. Reliable service, great support.I don't normally leave reviews but felt I wanted to for this service as it has been fantastic


I didn't want to review so soon on into taking out hosting with site valley but I feel obliged because their customer service is outstanding, second to none, every time I had an issue it was sorted immediately. I would highly recommend Site Valley.


I have been with Sitevalley for over a year and it's the best hosting I have EVER used. And I have been through a lot of them.


The support staff are amazing, and it's clear that they have a passion for hosting websites. I've rather enjoyed this webhosting company and it's stability for the price is bar-none, amazing.


My collegue adviced me to use SiteValley as a reliable hosting provider with great prices, professional and fast Customer Service. My experience with SiteValley was exactly the way I was promised.


I have been with SiteValley for many years, and plan to stay with them for many more. Customer support is very responsive and knowledgeable.
SiteValley.com is rated 4.8 / 5 based on 329 Reviews »

© 2001 – 2026 SiteValley.com. All Rights Reserved.